Sailing

Eleven foot, solid ash dinning table we designed for an amazing home nestled amongst the coastal hills and tall pine trees in Del Mar California. This home was spectacular, designed by Nakhshab Development and in close collaboration with the homeowner. All I can say is what an amazing space with attention to detail that is unmatched, I’m fortunate to have a very small part in this beautiful home.

DSCF3734 copy.jpg
DSCF3761 copy.jpg
DSCF3753 copy.jpg
DSCF3736 copy.jpg
DSCF3769 copy.jpg
DSCF3741 copy.jpg

Ash

Rancho Project

Its been such a pleasure to build relationships and get work with local architects/interior designers, as well with those outside of California. At this point in our business, roughly half of our the work comes through my collection pieces that are made to order, while the other half are custom builds that often include working wth interior designers or directly with the client.

On the custom side of things, I wanted to share a bit more about one of our largest projects to date. Earlier this year I had the privilege of being commissioned to design and build five pieces for an Alexis Garret Design project. This amazing ground up build is nestled in the hills Rancho Santa Fe, which Alexis and her team have been putting together for the past couple years.

0F0B745F-31C7-49CD-B247-D75BDE8493E0.JPG

This was my first time working with Alexis and her initial request was for a 10’ custom dining table as well a 16’ settee to flank a large hallway in the home. After sketching a few diffident ideas for the dining table, we settled on the design you see below. The initial sketch did not have the legs exposed through the top, but after a second design meeting she suggested seeing some joinery/end-grain through the table top. It was a great idea, I love how that final detail turned out! The two matching benches were a later request and a great accompaniment to not just the table, but also this very large great room. The main difference from the table construction to the benches was the choice to not expose the legs through the top, instead to have the seat float about 1/4” over the legs all around.

DSCF3251.jpg
DSCF3260.jpg

The settee request was originally for one 16’, but that was changed for logistical and visual reasons. Plus, having two separate settees allows space for something fun in between. After some sketches and more design talk the two bench idea was approved and after 68 hand turned spindles, bent laminated crest rails on opposing ends with matching curved radius and hand scooped seats, these guys came to life.

7801C6E6-0FBC-4719-9011-779D8A3BB3A1-1130-0000008C6EBEAD0B.JPG

I leave you with some final images from this project and also say cheers to working with new people, building new friendships and putting furniture in peoples homes!

5429A372-D152-4659-9114-A6D5AD0B1FD2.JPG
9FC558BA-DDAB-461D-B399-C1C5C615062D-478-000000214CDCFAA0.jpg
40213BE4-29EA-4728-9003-4FDCF4C909E4.JPG
CA7D0C33-CB45-4A27-928F-DC594E366456-1104-000000AA6FCD0885.JPG

Lewers Bench

The Lewers Bench has been one of our best sellers since it was released a little over a year ago, so I thought I’d take some time to share more about it. These benches are inspired from my love of both Japanese and Scandinavian design, and the goal was to make a sophisticated piece that also gives nod to the relaxed beach lifestyle we have grown to love. We’ve sent this piece to modern beach homes on the coast of Majorca Spain, to quaint beach cottages here in Laguna Beach and even ranch homes in the Texas hill country.

DSCF0213.jpg
DSCF0212.jpg

Each Lewers Bench is made to order, often times in custom lengths. The longest this bench is made is 60” while the shortest we have made is 36”. Proportions are also taken into consideration the longer or shorter they are, meaning to keep the visual scale, individual parts are made thicker or thinner depending on the size of each bench.


The woven seat is made from a classic natural fiber called danish cord, used on many iconic, mid-century pieces we are all familiar with today. The seat is a very time consuming process, all the weaving is done by hand, in house and can take up to 10 hours for the longer benches.

IMG_5670.JPG
E3863969-E147-4CB1-BBA2-28AD600C4347-2899-0000022648F9EAD9.JPG

The legs are hand turned in house and attached to the bench using a through joint, meaning the end grain on each leg is visible through the top of the bench. Each joint is also wedged to make the joint even stronger and pretty much impossible to back out.

IMG_1936.jpg
DSCF0284.jpg
0EB2E148-7AA3-4EB9-8BA2-F28CC7EB9D42-7850-00000550EE42E19A.jpg
288A7BB9-75D6-48BE-A564-68D2E3731CCF.jpg

Finally, the Lewers Bench stamped, numbered and completed with a few coats of a natural oil, applied and polished by hand.

IMG_4077.jpg

Cheers

Japan II

Its been some time since our last post and much has happened since June. With that said, I’ve been wanting to share a bit more about our Japan experience and a few more images along the way.

To pick up around where we left off, Haley and I did a lot of train travel, along with even more walking. Something I didn’t share in the first Japan post is that Haley was 5 five months pregnant on this trip, which didn’t at all stop her from logging 5-8 miles a day, walking through each town we visited. So many things to take in on these walks, great people watching, chance stops into cafes that seats 6 people to sip coffee, and just grabbing fun images like the one below. A sweet old patina’d kettle on someones door step.

DSCF9976.jpg

One of our most memorable days also came on one of our walks through a small mountain town called Yamanouchi, literally at the end of the train tracks. It’s a small ski town, but in the middle of June we were the only ones at the train station and seemed to have the town to ourselves.

DSCF9968.jpg

As Haley and I were walking through the streets of a neighborhood, nothing happening except footsteps and listening to the stream along side the road, that I’m assuming was the last of the melting snow, we saw this older man turning wood bowls through his front window.

DSCF9927.jpg

He must have heard my camera start clicking and immediately invited us in. He greeted us with friendly bow and smile as the three of us exchanged hellos. I gestured to my camera to see if he would continue working so I could take some more photos, he was more than happy to.

His studio was about 150 square feet, filled with half turned bowl blanks and to my surprise, a foot powered lathe that looks like it has been around for generations and although very used, still in perfect working order.

DSCF9939.jpg


As we looked through his completed bowls I must have picked up one that is used for holding macha powder (a finely ground green tea). He stopped what he was doing and walked over, gesturing to drinking a cup of tea. Haley and I both assumed he was asking if we drank tea, so we just smiled and shook our heads yes. Apparently, we said yes to his offer for a cup of tea. One of the things that stood out to Haley and I was the generosity of their culture. This one experience was the highlight of our trip. I put my self in his shoes and when people drop into my studio…well lets just say my first thought isn’t tea, it’s usually how much time are they going to take away from my work and the plan I have my day. I’m not proud of that and know most if it is a product of our fast pace culture and competitive nature in we’ve created in America, which can all be good things, but can easily become a selfish endeavor. So yes, I’ve been working not that…

We sat down and enjoyed our teas together, tried to communicate as much as we could, all the while just soaking in the moment of this strangers generosity to stop his day and share some life together. I showed him pictures of my studio trying to convey I was woodworker too, we exchanged emails and after about an hour, finished our teas and got on our way. The time he spent with us is something Haley and I still talk about, it might seem normal to a lot of folks but hit me the most because it is something that I need to work on in my life.

DSCF9931.jpg
DSCF9950.jpg
DSCF9946.jpg

Cheers.

Japan

I don't often post about our travel, but figured this was a good time to start. 

As with most of our travels, they tend focus around food/drink and attempting to get to know the pace and life in the town. Often forgoing the tourist traps and long lines in exchange for the same coffee shop every morning and walking the streets. And, actually showing an interest in the folks who call it home will also get you a long way, even if you don't speak their language. 

As I'm writing, we are only half way through our travel in Japan but I wanted to share a day in our life in Kyoto and how we like to travel.

DSCF9679.jpg

Mapping out a few coffee shops before hand, we made this walk and passed this guy every morning, ending Arabica Coffee in the Higashiyama Ward. This street, among the majority of others is filled with history, below is one of the support beams of a small cafe showing the sophisticated joinery used on old building structures. 

DSCF9700.jpg

From here I'll just throw in some photos throughout the day and allow you to piece together the rest. 

DSCF9810.jpg

Ok, so I may have a bit more to say. I hardly ever use the term "best I ever had" but Akatsuki Coffee may have been it. We were told about this place from a friend who lives part time in Kyoto and we walked 7 miles round trip to get there. 

DSCF9798.jpg

Little, executed perfectly is far better than a lot done well. 

DSCF9805.jpg

The subtle attention to detail and thought put into simple design seem to be a good refection of the Japanese culture and way of life. Well worth the 7 miles walked in a cheap pair of Vans and three blisters on my toes. 

DSCF9799.jpg
DSCF9802.jpg

By this point, and a few more corners turned, we decided our new tally of 10 miles walked in one day was enough, and jumped on the local transportation. 

DSCF9787.jpg

Let's throw in lunch at a random place that looked good on our walk. I ended up ordering one of the three choices, boiled tofu paired with some other items that I was happy to try and sashimi tuna, miso soup, fresh rice and a local Kirin beer, which seem to go down a lot smoother than in the states.

DSCF9777.jpg

This day was also filled with great conversation along our many walks, but I'll spare the details and save some photos for later and end with a few shots from the neighborhood bar about a 100 yards from our cheap Airbnb.

Wrapped it up with a Negroni made from local gin crafted here in Kyoto. 

Cheers

DSCF9855.jpg
DSCF9857.jpg
DSCF9858.jpg

Summer Collection

So outside of custom work that's been floating through the shop there is a small summer collection that I'm looking forward to sharing in the coming months. As some of you may know, Haley and I grew up on the gulf coast and lived in Hawaii for a short time at the beginning of my furniture life. This small collection hopes to bring a little bit of those summer beach day memories into the home with light colors and mixed media, combining both solid wood and textile fibers. Below is a little taste of the process and clips of whats to come.

IMG_1910.jpeg
IMG_1936.jpeg
IMG_1887.jpeg
IMG_1958.jpeg

White Oak Delivery

Last week some really sweet white oak slabs, actually an entire matching log set including 9 slabs, was delivered at the studio. 

Kylle - wood delievery 02.JPG

I really enjoy and think it's important to know where my materials are coming from and how they are sourced. Over the past couple years I've traveled out to Pennsylvania to visit and select timber from Horizon Hardwoods. After the first visit and meeting with the man who started this business over 40 years ago, I could tell it was their passion to source not only the best timber, but to mill it in a way that creates a superior product.  

Kylle - wood delievery 03.JPG

Off-loading and numbering. Some slabs are all ready spoken for but there is plenty wood left and up for grabs!

Kylle - wood delievery 01.jpg

Below is a sweet walnut slab from the same folks getting it's first coat of oil and getting prepped for its base and delivery.

IMG_1545.JPG

Cheers

J'Lynn Credenza

March has been a good month and has seen a good pace. All the larger projects wrapped up at the end of February and thus far March has seen a simple and sweet coffee table build (posting soon), as well as closing in on the new floor lamp release... and, lets throw in some travels to the Hawaiian Islands for Haley and I's twelfth anniversary. 

The pics below are from the last credenza that wrapped up before March. This one was once again solid walnut, though this time un-steamed, hence the more reds in the wood and greater differentiation between the sapwood and heartwood. Roughly %90 of the walnut on the market has been steamed to create a more uniform color, this slab however had not been steamed, leaving that sharp contrast between the lighter sapwood and darker heartwood. I thought it would be nice to highlight this by book-matching the boards and turning the sapwood toward the center, creating a continuous streak around the entire piece.

Below are some pics of the process and final piece, hope you enjoy! 

IMG_8591.JPG
IMG_8743.JPG

The Magnolia Credenza

Things have been busy in the shop this new year, living and working in the same town has been a great experience.  Along with commission work, I will also be devoting this year to a small collection of furniture. These pieces will be available for purchase and made to order. The premise is putting high quality, solid wood furniture in peoples homes with a more affordable approach. One of the most costly parts of a one-off piece is the design and engineering time, I want to give the client an option for heirloom goods that have already been thoughtfully designed. 


Solid walnut case, sliding doors | Wenge base | Shop made brass hardware

Little guy.

Last shippment of slabs that came in there were a few "scraps" strapped on top of the load to make weight on the pallet. Turns out, they made a couple fun little coffee tables. 

Figured it was a good chance to practice turning some legs and join the cool club. Sometimes "cool" turns out to be less time consuming, but more expensive, sad but true. 

Had a little accident with the forstner bit when drilling the holes for the legs in the top. Instead of planing it down I thought I'd make it a circle/square (patch) combo. 

IMG_8457.JPG

Good day folks;)

Move In Day

I know its been a while, but I wanted to catch everyone up on whats been going on since the new studio move in this past Spring. Looking for not just a space, but the right space took a lot of patience and waiting....and waiting. I know now that even my friends were growing tired of the "you find a space yet...NO, still looking". I was also at the point where I was ready to throw in the towel and resort to a work environment that promised myself I wouldn't do.

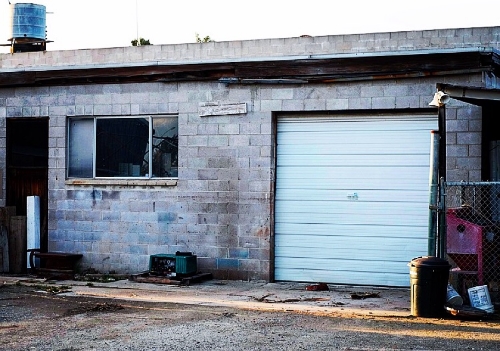
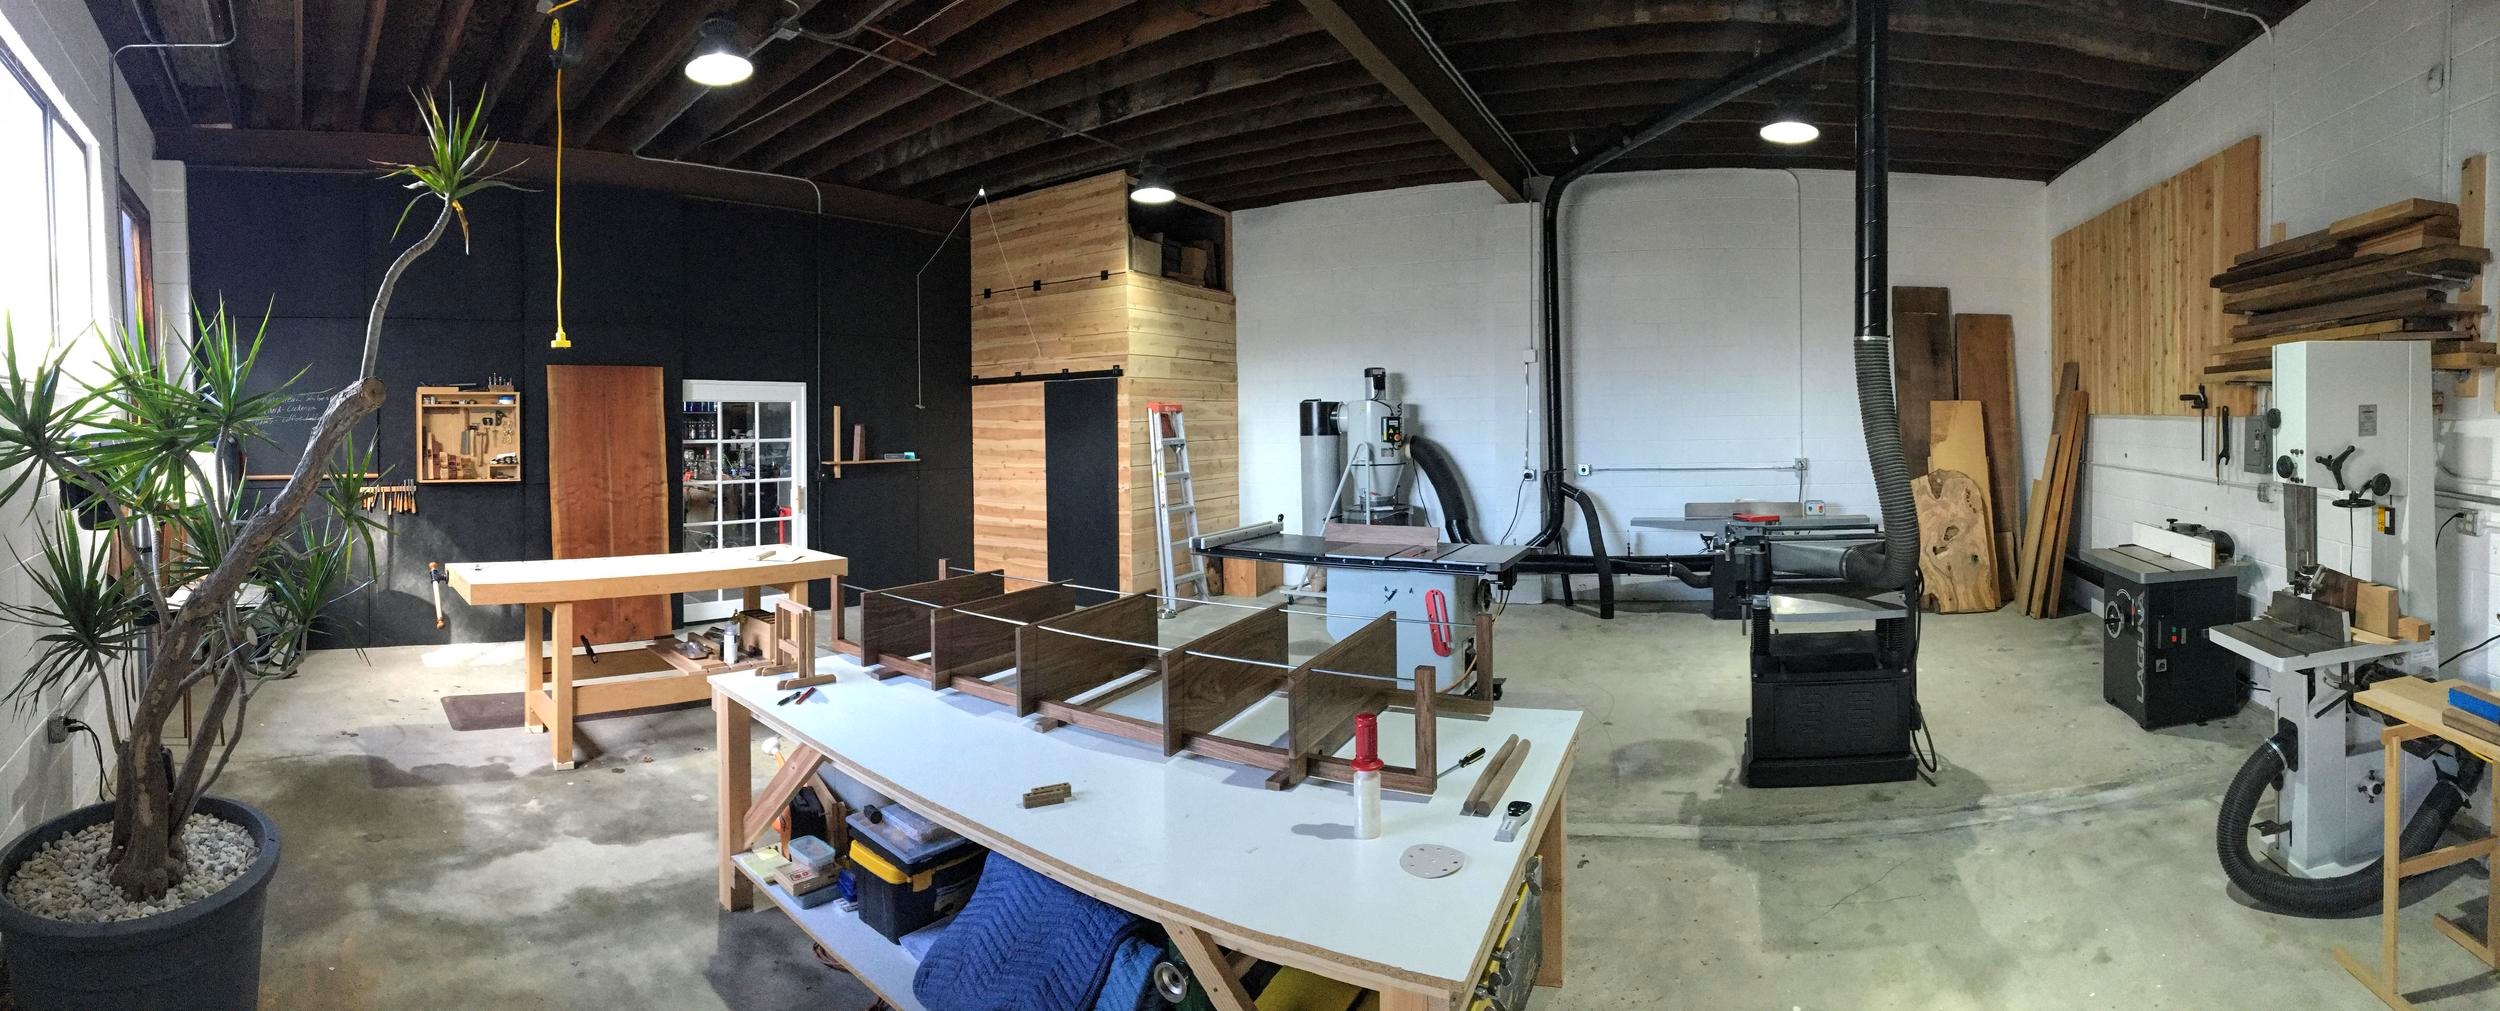
Long story short, Haley and I were hours from signing an overpriced lease on an industrial space tucked back among the square box, next to another square box, with a drop ceiling office in the front. We've all seen these spaces and there is nothing wrong with them, but for me and the vision I have for the business, it was the last place I could see myself being. I woke up the morning of the signing and told Haley, I didn't know what we were going to do, but I wasn't signing that lease. It felt good to turn it down but it was immediately replaced with the burden of "what next" a continuation of the past three years.  That same morning, I opened the Craigslist pages and saw an aerial view of a property down the street from our apartment which read, "creative space for rent, manufacturing allowed". This space was the old cabinet shop, surf shop and glass shop on State St. in Carlsbad. Side note, the main problem with all these little pocket beach communities is that the city is rezoning all the properties as they sell, for restaurants and boutiques, which is great, but this eliminates all the creatives, and in my opinion takes part of the community out of the community. So, this property, with the original family owning it since the 50's, is still zoned commercial...Hurray. The landlords are great and run a small store in the front of the building while the rest is divided into three spaces which accommodate a potter, a coffee roaster, and myself. The building needed some work, mainly a good cleaning. I'll leave you with some pics of the progress thus far.


Move in day

Four weeks later

Getting there

Hope all is well going well for everyone, I wanted to take some time and catch you up on what has been going on from the shop. After the last coffee table build I went in the direction of fulfilling Autumn floor lamp orders and other small projects for individual clients. Also, I have finally decided to move onward from the shared work space I have been in over the past couple years and search for a studio of my own. It has been a fun and challenging couple years in starting my own business and I am excited about moving forward, learning from my mistakes and expanding my successes. Below is a collection of shots taken over the past few months, nothing crazy, just keeping busy.

DSCF9689.jpg

I have really enjoyed creating the lighting, such as the Autumn Floor Lamp, and maintaining a pace of work I enjoy...slowing down, using hand tools and creating a product that I am proud of. Once things are back up and running, I plan on launching a small line of handmade furniture based on a new floor lamp design that was completed before I moved out of my old space. These pieces will still be made to order, using hand selected materials and an acute attention to detail. My intention is not to move in the direction of a production furniture shop but to maintain a pace of work and attention to detail I prefer.

Needless to say, I am anxious to get back in the shop but I do have a small window in which I can be patient and find the right space. During this time Haley and I have some travels coming up as well, so although not wood related, there will still be a post or two to look forward to.

Here is to finding my new work space and moving on.

Cheers


Low Craftsmen

This past month I had the privileged of making a coffee table for an amazing family that Haley and I are blessed to have in our lives.

It was large coffee table, 52" 32" 17". I tried our local lumber yard but couldn't find large enough pieces of Walnut. Since I didn't want to piece the top together I ended up ordering a slab (and maybe a couple extra?... for a rainy day), this way I could get a nice book match for the top. As far as design goes everything, was pretty straight forward, no curves, mortise and tenon joinery, a single hand cut dovetailed drawer, shop made brass hold downs and an oil finish.

DSCF7704.jpg
DSCF7761.jpg
DSCF7778.jpg
DSCF8013.jpg
DSCF8072.jpg
DSCF8117.jpg
DSCF8152.jpg
DSCF8189.jpg


Cheers

Lynda's Cabinet

Thank you for your patience in following along with this build. It was a more than a pleasure over the weekend to deliver this jewelry cabinet to its new owners, they will always hold a special place in Haley and I's heart. During the past year the cabinet was not the only piece of furniture that passed through the doors of my shop, but as far as a single piece, it gladly took most of my time and thought. The exterior is constructed of instrument grade Koa sitting on a Wenge base, while the interior consists of Boxwood drawer fronts, Sycamore drawer sides, Port Orford Cedar drawer bottoms and a Mediterranean Olive hidden box.

lynda7.jpg

I spent some time deciding a method to lock the cabinet. Ordering multiple mechanisms and not being satisfied, I decided on making my own. It was very simple, a steel rod enclosed in brass, that will drop down when not being held up with the below pictured, magnetic wooden key.

Once again, what a joy it was to make this cabinet and thanks for following along.

Cheers

&

Good night.

Good morning, we are finally getting some good rain here in southern California so I figured it would be a great morning for coffee and some blogging. Since the last post I have moved on to the design and build of the stand. We deiced on Wenge, a dark, almost black tropical wood that is not so friendly to work with hand tools, but with a little time the end product is stunning. When it came time for the shaping and faring of the curves the only tools that work well are scrapers (basically piece of steel with a bur turned over on an edge) properly tuned it can create a shaving like a hand plane and leave a beautiful surface. To start, I milled the rough stock, prepped for the joinery placement and began cutting the mortises.

Cutting the mortises is done while all the stock is still square, leaving the pieces a shade over sized to allow for the cutting and faring of the curves.

After all the joinery was complete it was time to lay out the curves, first cut free hand on the band saw then fared with scrapers and rasps. The insides of the legs have a concave surface while the outsides have a slight convex. Once shaped and surface prepped, it was on to glue up, one more final surface prep and placing a small bevel around the top.

With all the large tasks completed it's time to sit at the bench and work some of the smaller details. There are still a handful of things to complete, small trays for the drawers, installing the lock, milling brass mounting hardware for the stand, and designing drawer pulls.

After a few different mock ups for pulls I decided to keep with the boxwood, matching the drawer fronts.

Gluing in the drawer pulls is always a satisfying feeling, being able to open the drawers without pulling on a piece of blue tape... great.

Until the one last post...cheers

DSC_0134.jpg


Ok, switching over to black and white from here on out with this build. I hope this post finds everyone doing well. I last left off cutting the dovetails on the drawers. One of the most important things in dovetailing is to have clean, straight lines throughout the pins and tails, this is easily achieved with the help of a squared up chopping block seen below. I was taught this method and really believe it's a good way to go for hand cut dovetails.

DSC_1734.jpg

After the drawers are glued up and before the bottoms are fit, I moved onto fitting each drawer in their pocket. Each drawer is made about a 1/32" too wide and then planed down to fit. This way, you can sneak  up that piston fit.

It's always important to have a design and a plan on how the piece will come together, but equally important for myself in this process is allowing the piece to direct itself. The middle section I purposefully "built around", leaving a negative space that could be utilized to add something of thought. Keeping the client in mind during this composing process, is to me, what makes crafted objects come alive to the individuals who use them on a daily basis. With that said, it is not often enough that the craftsmen/women of today get a chance to exercise this gift, so... I am very thankful for this opportunity.

On to this negative space, I wanted to have some sort of tray to place jewelry on once pulled from it's drawer, maybe to set one earring on while pinning the other. I thought through a small pull-out tray and decided using a door that flips down would be best. This Idea posed a problem with the hinge mortising since that is something that would usually be done before the final glue up of the partitions. I tried a couple different hinge styles and ended up using the smallest set of knife hinges I could find, mortising them into the tray the depth of both sides of the hinge. Doing it this way allowed the other side of the hinge to not need mortised, since that would be almost impossible without introducing a degree a difficulty that might allow a mistake that couldn't be undone.

Below you can see the tray in place utilizing the inside shelf as a stop for the tray itself.

With the interior completed and back panel glued in, I was able to move on to the setting the doors, first by placing the hinges. After the hinges are placed, a final fitting of the doors and can be dialed in. Leaving the doors a shade large, they are easily fit by taking a few plane strokes off here and there.

Cheers.


Good morning

I left off needing to find a lock that would work for this cabinet. After a lot of searching the web and inquiring about custom locks I decided to order a couple. I was not impressed...at all, even the nicer locks were just too bulky and designed more for a box style install, and frankly still had a cheap look and feel. I am happy though that I went through this process, in the end I decided to design and build a lock myself. I wanted something simple and if I could get away with it, something clever that would not have a key hole. So, when the build comes to an end I'll post on how the lock works but it is basically a stainless steel rod that drops down from the top inclosed in a brass sleeve....and no key holes!!

With that decided, I set up a couple jigs on the drill press and got to work milling the brass sleeve to house the stainless steel piston.

After all the door stop mortises were chiseled and the lock mounted, I was able to finally start the glue up. But first it was time see this Kao come to life and apply some tung oil!

The first step in the glue up was to put the boxwood panels inside the top and bottom to allow for clearance from the door stops when the drawers are opened and closed.


After gluing the carcass was complete, I was able to begin each one of glue ups for the partitions.

IMG_4155.jpg

 As for the drawers they started off with the fitting of each side to each individual pocket. I chose clean, straight grain curly maple. When choosing drawer sides I like to pick a wood that I know will hand plane easily, this helps when fitting each completed drawer to their pocket.

IMG_4166.jpg

With all the drawer sides fit it was finally on to choosing a dovetail layout, milling up the drawer fronts and chopping some pins and tails! A lot of pins and tails!! Still doing that in fact.....

Cheers!


It was great to get back to work on the koa cabinet this past week. I left off with putting the last bit of faring on the front curve before applying the edge banding.

Gluing on the front edge banding was pretty straight forward since the curve is so subtle, just a lot clamps and some small angled calls on the back side.


DSC_1550.jpg

With the all the edge banding done and the doors coopered (to a touch over sized) I was able to move to the interior. This is a process that I really enjoy, kinda like designing a puzzle, making the parts and then getting to put the whole thing together. After going over a few different layouts and deciding on one I liked (eleven drawers total) I was ready to get under way on all the parts.

With all these parts starting to pile up after the interiors were completed , I shifted gears to the mortises for the knife hinges. Side note...for any of you that are looking for a better alternative to the commercial knife hinges available, I would have to say these hinges that Bob Sanderson puts out from his shop in Fort Bragg Ca. are some of the best, always precise look so sharp!

With the cabinet dry fit, using a shim, I locate the placement of all four hinges, mark the layout and start chopping.

Any time to turn the machines off and sit at your bench is a good time... Just some hand tools and a little patience and these hinges went right in.

DSC_1650.jpg

Well that wraps it up for the post...top, bottom, sides, partitions and doors! Next, final fitting of all these interior parts and slowly gluing this thing together!

I know they are a bit late, but I am finally getting around to posting some shots of a couple projects I completed at the end of last year. The first is a walnut dining table commission and the second was a spec piece made to take up to the West Cost Craft and Design show.

The dining table is to book-matched walnut slabs on a wenge base. I had fun building this piece and hate to see it go, but fortunately know that is going to a great home!

D 84" 39" 29 1/2"

table1.jpg
table7.jpg
table2.jpg
table8.jpg


This second piece was from a couple nice boards of walnut I had been saving to slice into veneers and this seemed like the perfect project.

CR13-01.jpg
EB13-05.jpg
CR13-02.jpg
EB13-03.jpg